I am almost ready to start the running rigging. I was very disappointed to find that the kit instructions basically say “We’re not going to tell you where each line goes, just look at the (completely inadequate) pictures.” With no outside help, I might have given up at this point.
Thankfully, user Trufo on Model Ship World has posted some detailed diagrams of how each line runs. After studying those diagrams at length, plus some help from the folks in the rigging forum, I have a plan for how to run each line. I am posting the plan in detail here, in case it is of value to future builders of this model.
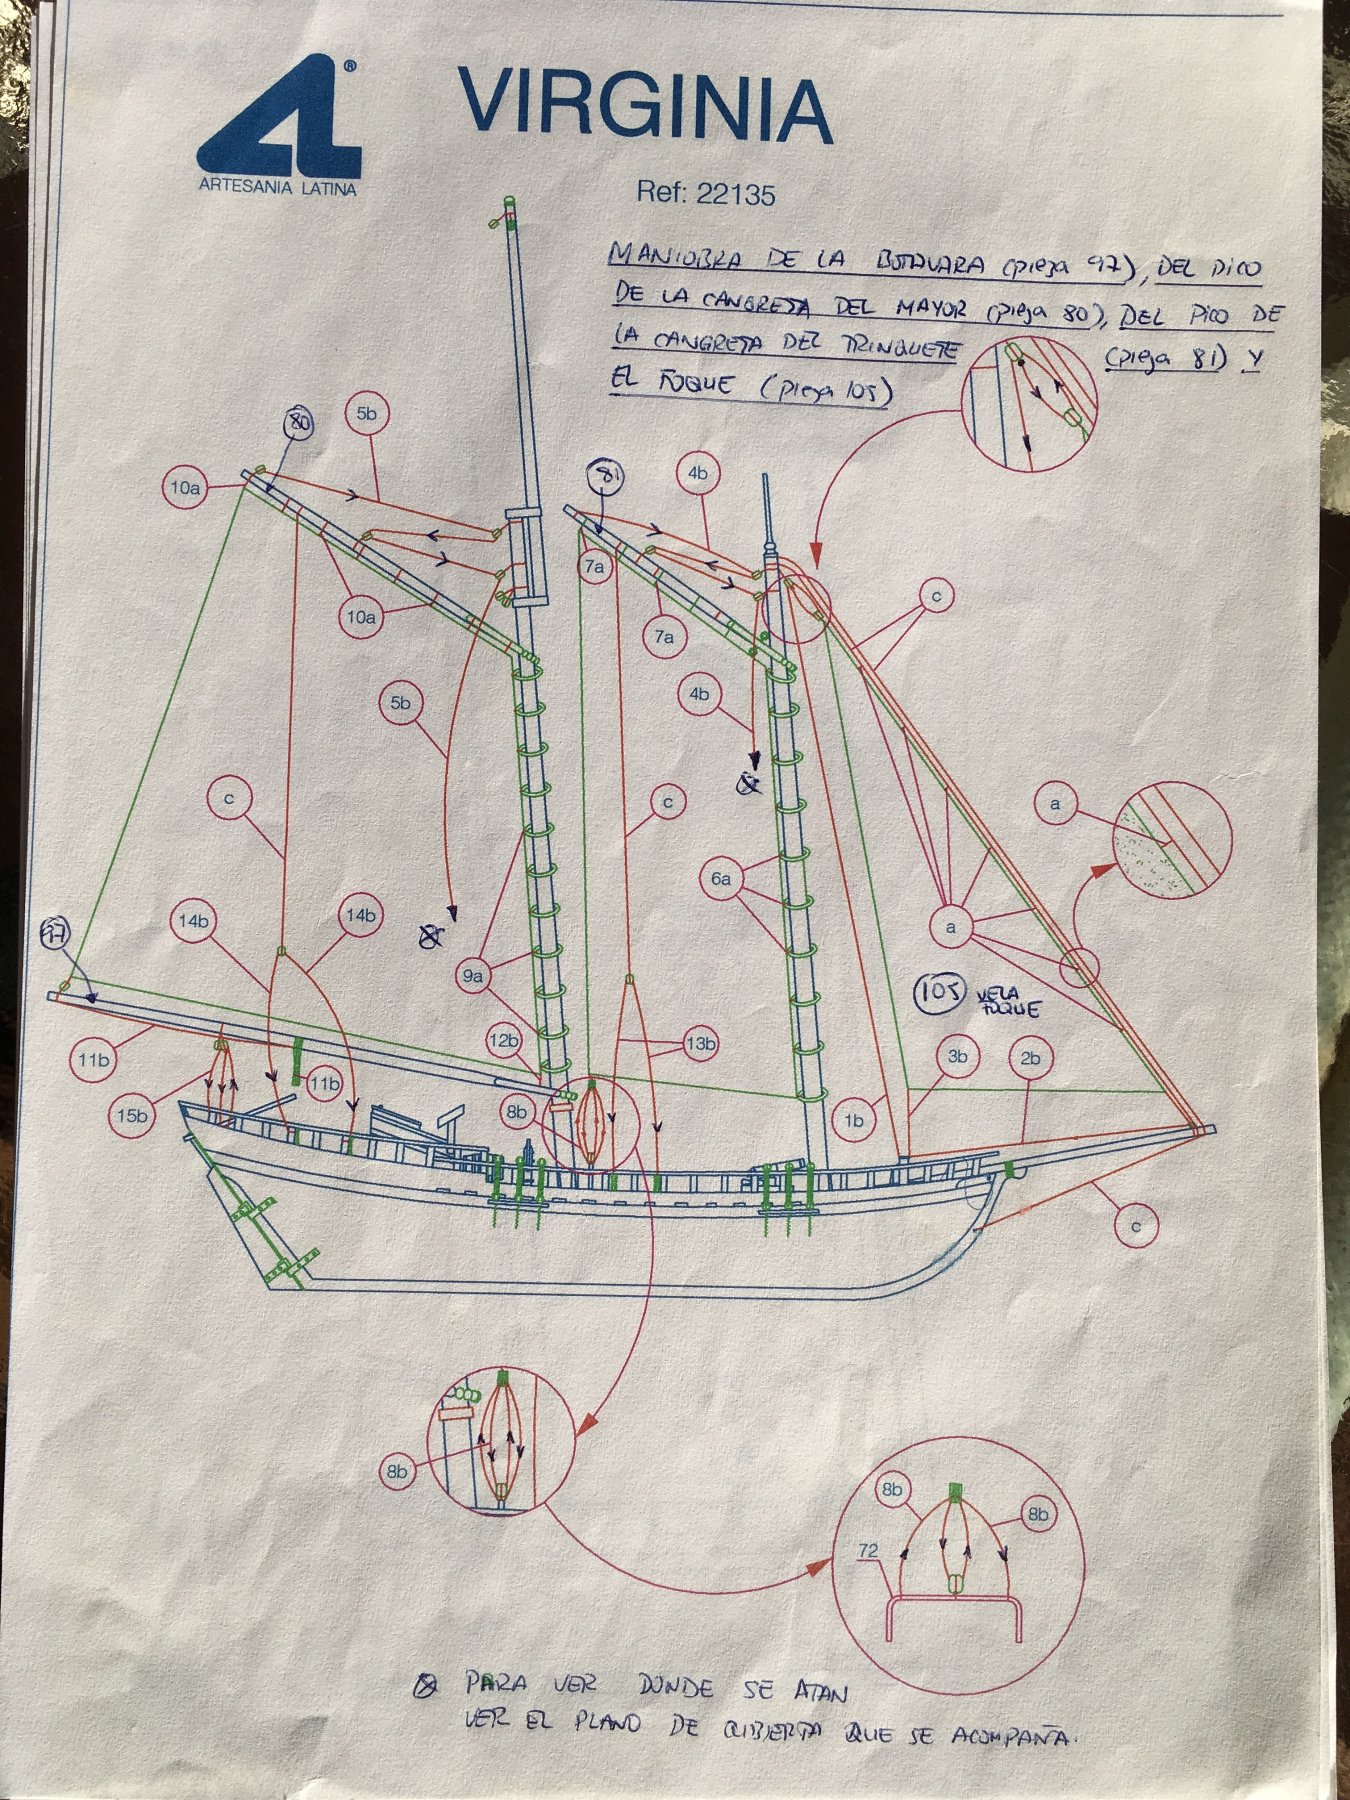


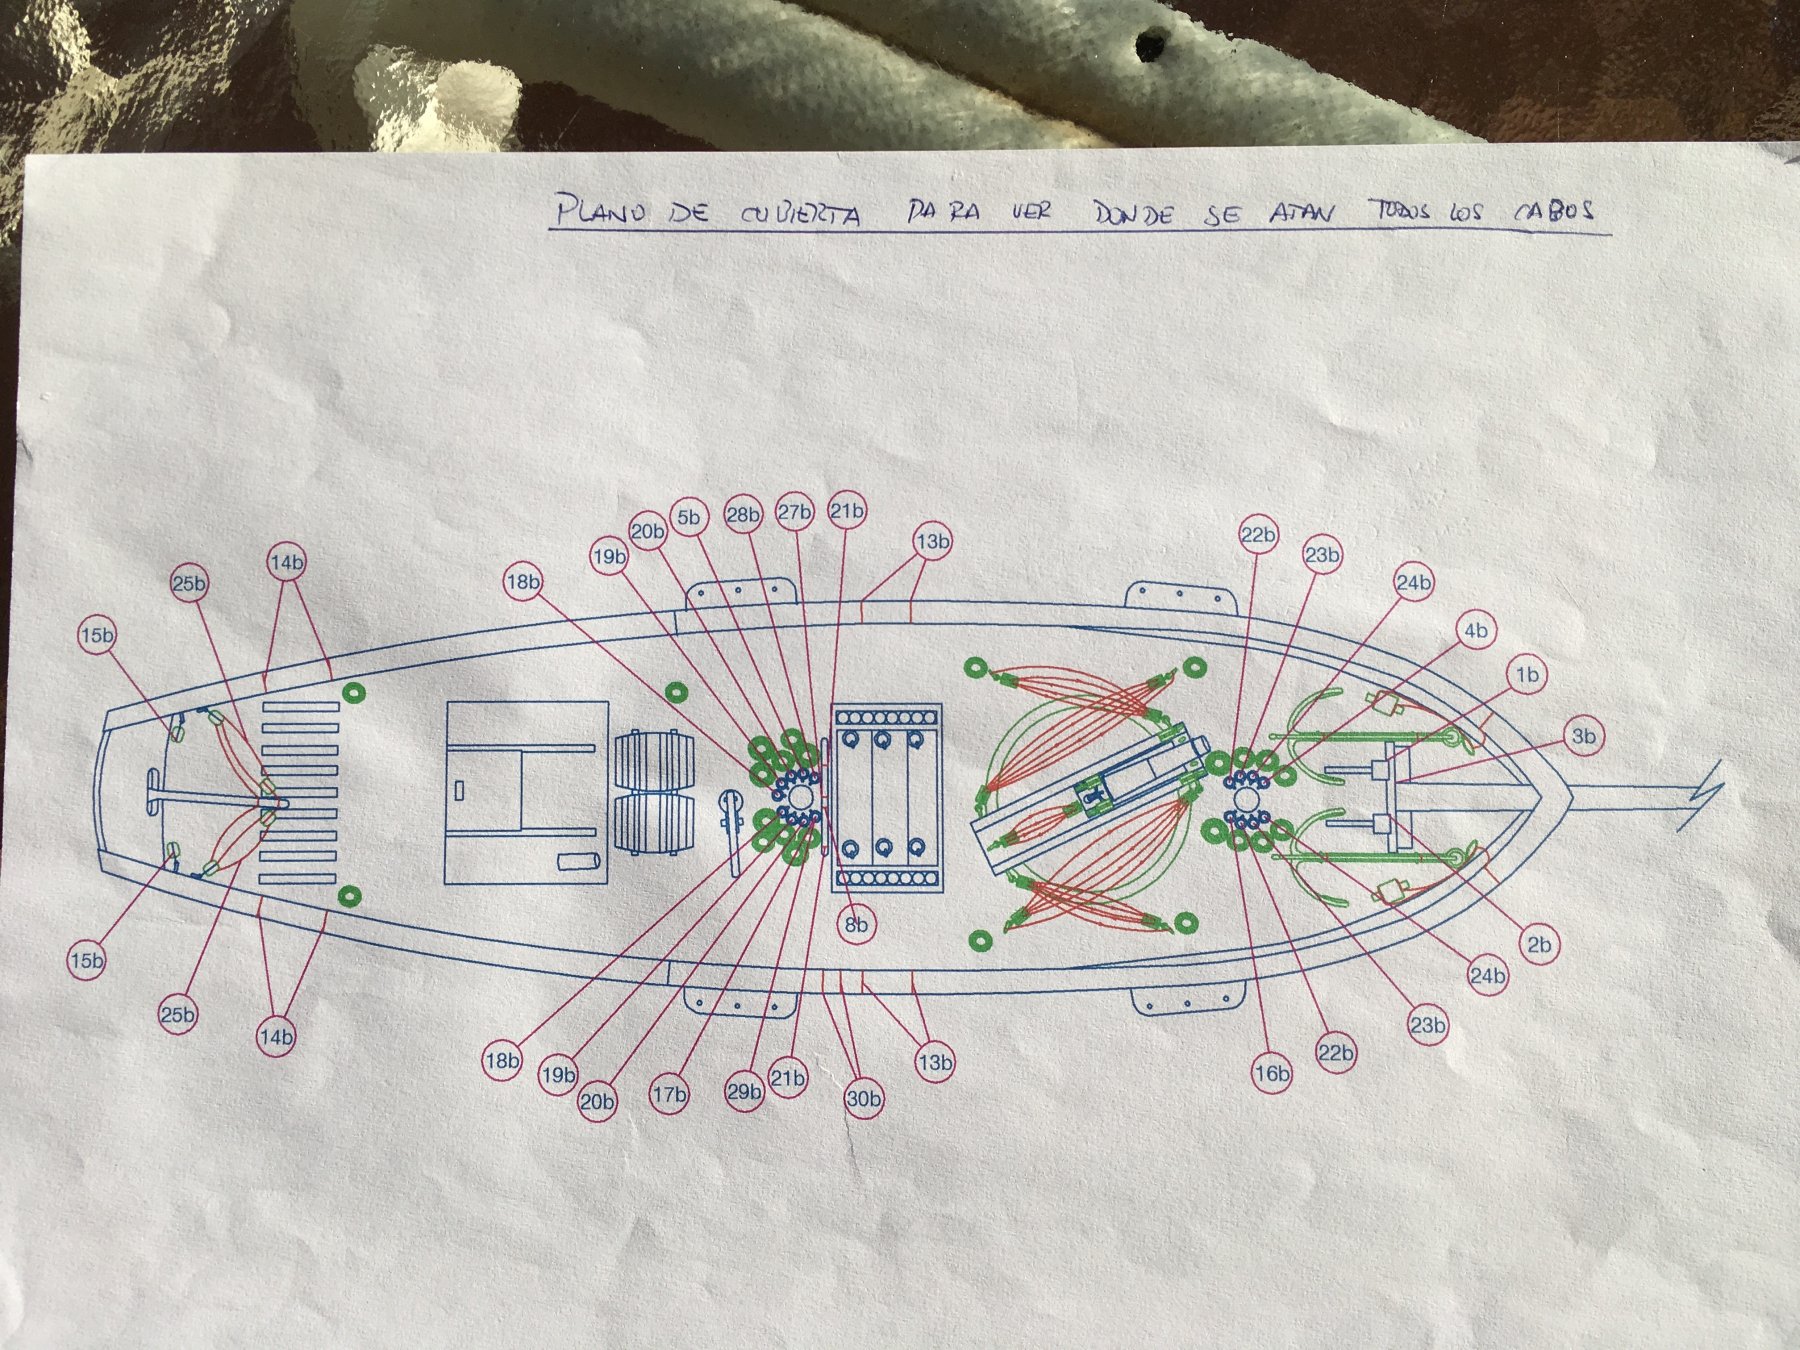
Here is my enumeration of the rigging lines. The numbers I use below directly correspond to the numbers in the diagrams from Trufo. As a novice ship builder who didn’t know luff from leech two weeks ago, I can’t promise that everything here is technically or historically accurate, but this is what I’ve been able to work out.
- jib halliard – Starts at a becket on a single forward-facing block at the top of the foremast, through a single block at the head of the jib sail, back through the starting block, down to belay on the port bowsprit bitt.
- jib downhaul – Starts at the head of the jib sail, runs down channelled through the jib sail hanks, through a single block at the end of the bowsprit, then aft to belay on the starboard bowsprit bitt.
- jib sheet – Starts from the clew of the jib sail, runs aft to belay on the upper bar between the bowsprit bitts.
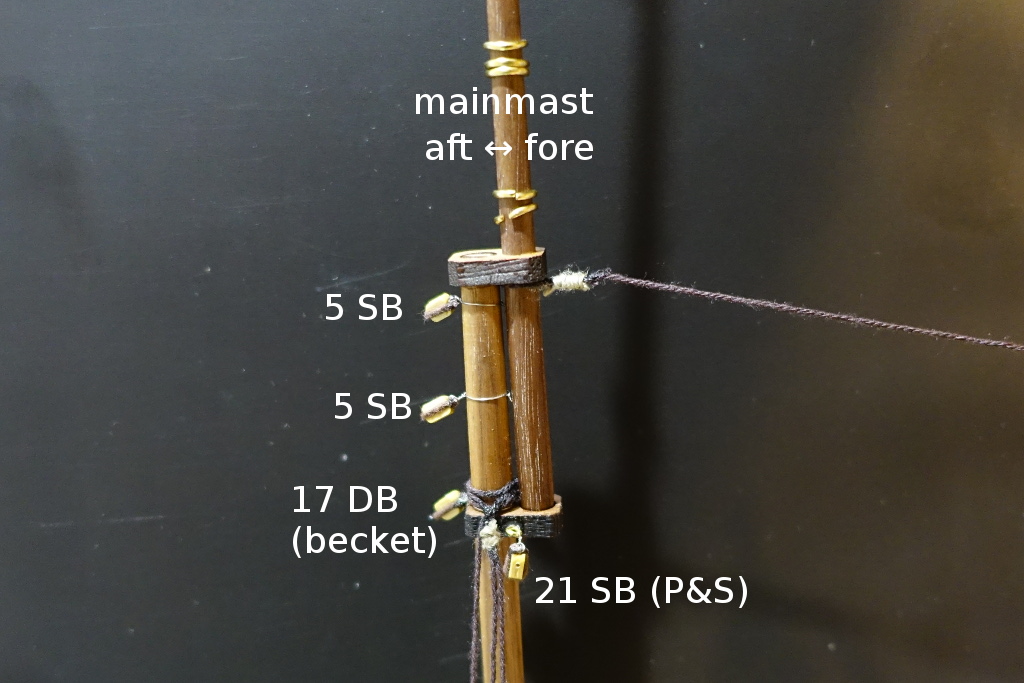
- fore peak halliard – Starts at the end of the foresail gaff, through a single aft-facing block at the top of the foremast, through a single block at the center of the foresail gaff, through a lower aft-facing single block at the top of the foremast, down to belay on an eyebolt at the base of the foremast.
- main peak halliard – Starts at the end of the mainsail gaff, through a single aft-facing block at the top of the mainmast, through a single block at the center of the mainsail gaff, through a lower aft-facing single block at the top of the mainmast, down to belay on an eyebolt at the base of the mainmast.
- Not a rigging line, this refers to the attachment of the luff edge of the foresail to the foremast by the mast hoops.
- Not a rigging line, this refers to the attachment of the head edge of the foresail to the foresail gaff.
- foresail sheet – Starts from the horse near the cargo hatch, up through a double block attached to the clew corner of the foresail, down through a single block attached to the horse, up through the double block again, down to the the opposite end of the horse from the start.
- Not a rigging line, this refers to the attachment of the luff edge of the mainsail to the mainmast by the mast hoops.
- Not a rigging line, this refers to the attachment of the head edge of the mainsail to the mainsail gaff.
- mainsail outhaul – Starts at the clew corner of the mainsail, through a single block at the end of the boom, to the middle of the boom where it is wrapped around and secured.
- mainsail tack – Starts at the tack corner of the mainsail, down to an eyebolt on the jaws of the boom.
- foresail vangs – (One port, one starboard) Using the standing rigging thread, a line is run from the aft half of the foresail gaff down about 2/3rds of the way to the deck, ending with a single block. Using running rigging thread, start on the railing, up through the single block, back down to the railing and secure.
- mainsail vangs – (One port, one starboard) Using the standing rigging thread, a line is run from the aft half of the mainsail gaff down about 2/3rds of the way to the deck, ending with a single block. Using running rigging thread, start on the railing, up through the single block, back down to the railing and secure.
- boom sheet – (One port, one starboard) Starts at a becket on a single block near the end of the boom, down to a single block near the tiller, up through the starting single block, down to belay on an eyebolt near the tiller.
- fore throat halliard – Starts at a becket on a double block near the top of the foremast, down through a double block near the foresail gaff jaws, up through the starting block, down through the lower block, up through the starting block, down to belay at the base of the foremast.
- main throat halliard – Starts at a becket on a double block near the top of the mainmast, down through a double block near the mainsail gaff jaws, up through the starting block, down through the lower block, up through the starting block, down to belay at the base of the mainmast.
- mainsail upper brail – (One port, one starboard) Starts at the leech edge of the mainsail, through single, double, and triple blocks along the mainsail gaff, down to belay at the base of the mainmast.
- mainsail middle brail – (One port, one starboard) Starts at the leech edge of the mainsail, through double and triple blocks along the mainsail gaff, down to belay at the base of the mainmast.
- mainsail lower brail – (One port, one starboard) Starts at the leech edge of the mainsail, a triple block along the mainsail gaff, down to belay at the base of the mainmast.
- boom topping lift – (One port, one starboard) Starts at the end of the boom, through a single block at the mainmast trestle trees, down to belay at the base of the mainmast.
- foresail upper brail – (One port, one starboard) Starts at the leech edge of the foresail, through single, double, and triple blocks along the foresail gaff, down to belay at the base of the foremast.
- foresail middle brail – (One port, one starboard) Starts at the leech edge of the foresail, through double and triple blocks along the foresail gaff, down to belay at the base of the foremast.
- foresail lower brail – (One port, one starboard) Starts at the leech edge of the foresail, a triple block along the foresail gaff, down to belay at the base of the foremast.
- Secures the tiller arm to eyebolts at the port and starboard sides of the helm area.
- Not a rigging line, this refers to the attachment of the luff edge of the topsail to the topmast by the mast hoops.
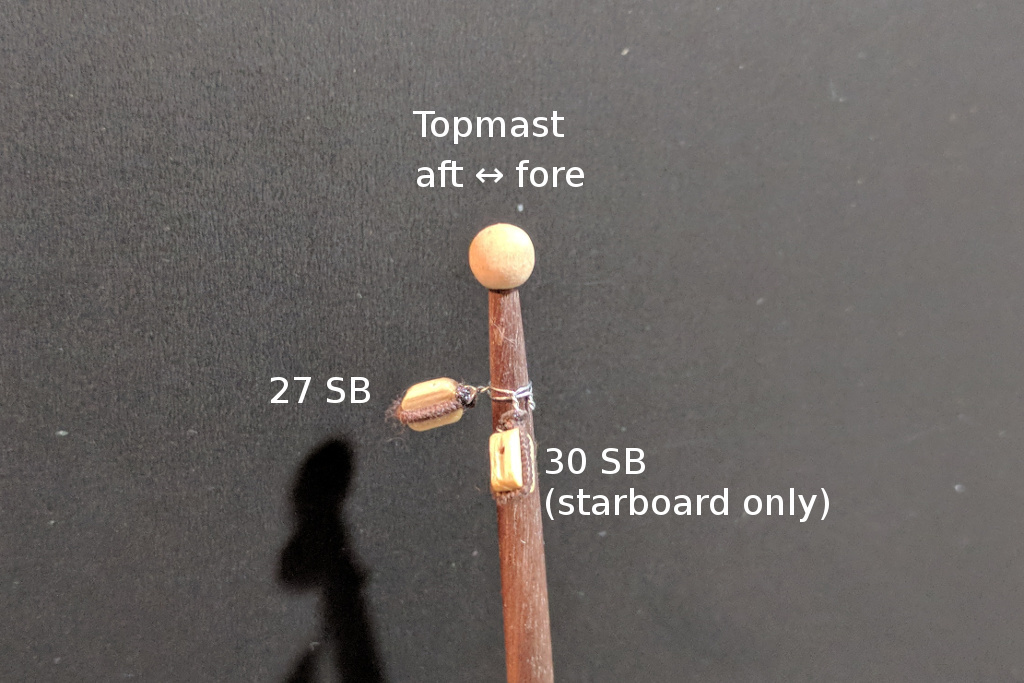
- topsail halliard – Starts at the head of the topsail through a single aft-facing block at the top of the topmast, then down to belay at the base of the mainmast
- topsail tack – Starts at the tack of the topsail, down to belay at the base of the mainmast.
- topsail sheet – Starts from the clew of the topsail, through a single upward-facing block at the aft end of the mainsail gaff, through a single downward-facing block at jaws end of the mainsail gaff, down to belay at the base of the mainmast.
- flag halliard – Starts from the starboard railing just in front of the mainmast shrouds, up to a starboard-facing single block at the top of the topmast, down to secure on the same railing.
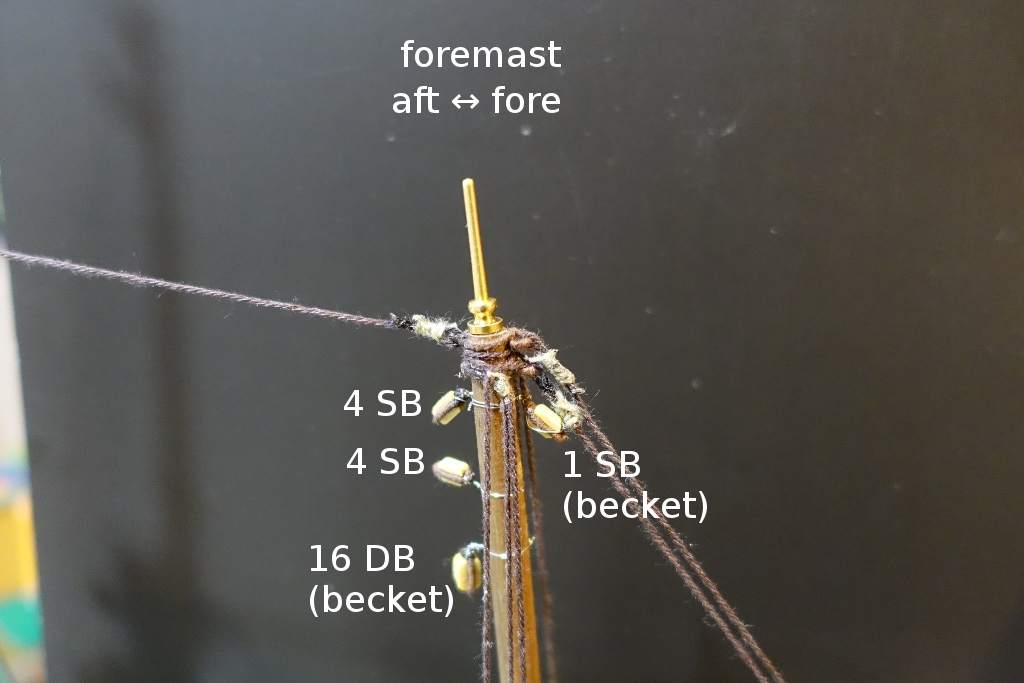
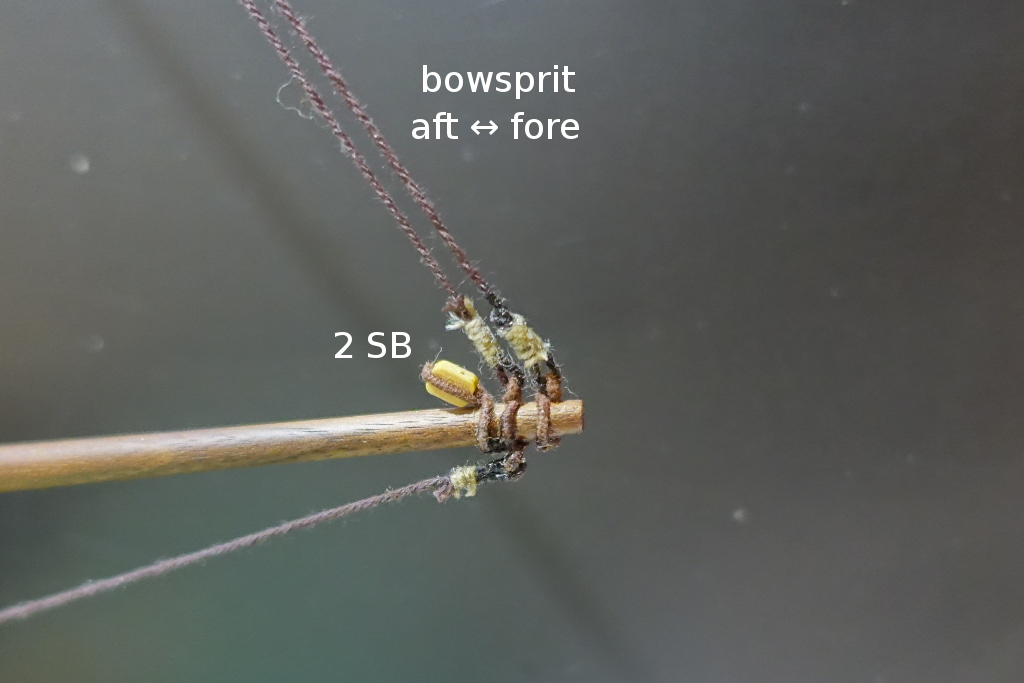
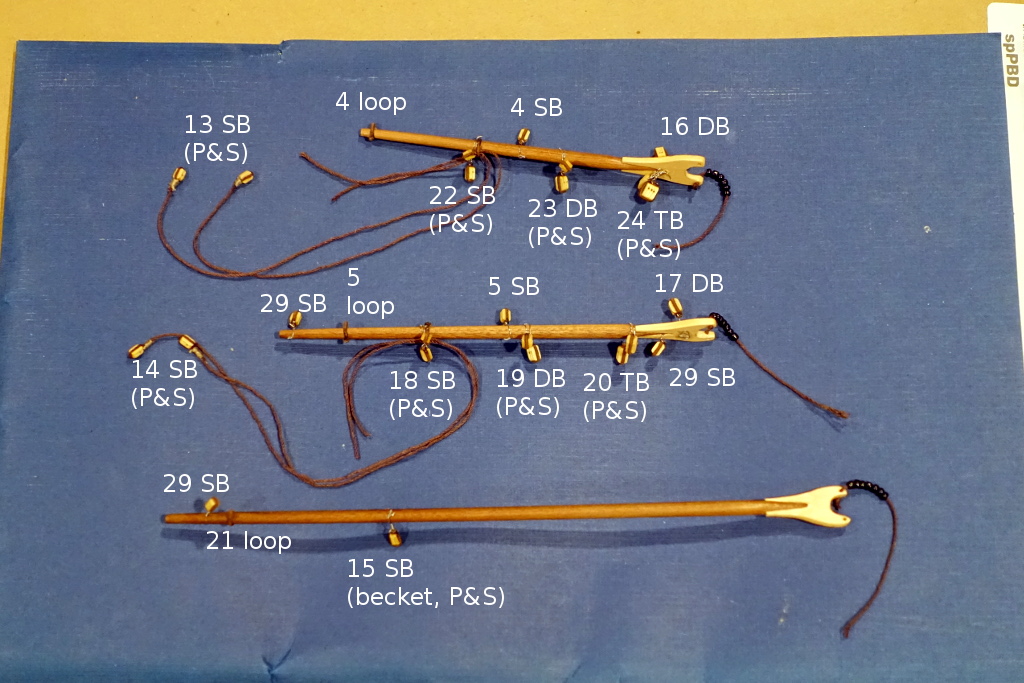
The pictures below show the locations where lines will be run on the masts and spars.
number – indicates which rigging line passes through that location
SB – single block
DB – double block
TB – triple block
loop – A loop of wire is attached to this point; a line will be started by tying it to the loop
(becket) – There is a becket on the block; a line will be started by tying it to the becket
(P&S) – There are two blocks, one port and one starboard
hi more of a question how do u go about getting thread threw the blocks and tackle
Use a needle if you can, though sometimes the head of the needle will be too large to pass through the block. Instead of using a sewing needle, needles sold as collapsible beading needles are much thinner and also flexible.
Another method is to dip the end of the thread in CA glue and wait until it hardens. Then cut the end at an angle so that the hardened end becomes a sharp tip. Then use that tip to pass through the block.
thank u